Online sales and marketing is complex. I mean seriously complex.
I’m going to try my hardest to dumb it down. Not because you’re dumb, but because it’s complicated.
This guide will be broken up into 5 stages, taking you step-by-step through a comprehensive breakdown of the online marketing and sales funnel from top to bottom:
To skip straight to the section you're interested in most, just click on the link in the table of contents above.
If you have any questions let me know in the comment section.
Let’s get into it!
If you want to download this article as a PDF to keep it as a resource, just click here!
Marketing and Sales Funnel Stage One: Driving Traffic
The first step of your online sales funnel is making all about driving traffic to your website.
There are two primary ways to do this, SEO and advertising: organic traffic and paid.
1. Use SEO to drive people to your blog and website
SEO, or search engine optimization, is a broad term for an endless number of strategies all focused on getting your business to the top of a search results page (SERP) when someone types in something related to your business.
SEO is the foundation of content marketing: creating content (usually a blog) which answers the questions your target market has.
For instance, it’s entirely possible you found this article by typing something like “simple guide to marketing funnels” into Google. This article appears because it contains the keywords you typed in, as well as dozens of other reasons (like link-building, page authority and more).
2. Use advertising to drive traffic to your website
The alternative to SEO (though of course they can be done at the same time) is paid ads: paying for people to see your business.
First option is to pay for Google Ads...
Depending how much you pay, this will guarantee your business is on the first page of Google search results for your target keywords.
Google ads also include “display ads,” which are predominantly those top and side-bar banner ads you see everywhere online.
Important Points about Google Ads:
They’re often referred to as PPC Ads, which stands for “Pay-per-Click”. This is because the dominant budget structure is based on your business paying every time someone clicks on your ad.
The amount you pay changes based on how competitive your keywords are (as in, how many people want to have their ads shown when someone types them in) as well as how prominently you want your ad to be featured.
Pricing varies, somewhere between $1 a click and $75.
Second option is to pay for Facebook Ads…
 Facebook Ads
 feature on the Facebook newsfeed, either right in the middle amidst user’s statuses and updates, on the sidebar below the trending stories, or on mobile newsfeed (which doesn't have a sidebar).
One of the coolest features of Facebook Ads is its targeting. Where Google allows you to drive traffic from people searching for something related to your business, Facebook allows you to show your brand exclusively to people likely to be interested in it.
Important Points about Facebook Ads:
They’re cheaper, but have about around 1/10th the click-through-rate of Google Ads.
My first recommendation for getting the most out of Facebook advertising is to inform yourself as much as possible.
Look up “custom audience targeting,” “website custom audience targeting,” and “lookalike audience targeting.” Build an audience at least 100,000 people strong, but no more than 300,000. Create many different ads (try Facebook's Power Editor Chrome plugin for that) and test them against each other until you find the design that works for your target market.
No matter what strategy you choose to drive traffic to your website, you need to ensure that, when they get there, they engage with you in some way (to keep them on the path to becoming customers).
Which leads us to generating leads…
Marketing and Sales Funnel Stage Two: Generating Leads
Lead generation is the stage of your funnel in which an anonymous website visitor becomes a real person - someone you can communicate with and show how awesome your business is.
And it’s a critical component. After all, it doesn’t matter if you’re getting one website visitor a month or one million, if none of them are becoming customers you’re in the same position either way.
Lead generation puts you on the right track to positively influencing the chance of a website visitor becoming a customer. Without it you’re just crossing your fingers and hoping.
There are a few major pieces of the lead-gen funnel you need to know about:
1. Free-trial lead generation
2. Opt-in lead generation
3. Landing pages
1. Free Trial Lead Generation:
Free-trial leads are considered “warmer” leads than opt-in leads or subscribers. They’re likely shopping around between your business and competitors.
The act of moving a free trial lead to a paid plan is called “onboarding” and is done a couple primary ways: account managers/sales associates and
email nurturing.
Account Managers: Facilitate (generally B2B) onboarding through personal email, platform demos and sales calls. This strategy for onboarding is time-heavy and works best for high-priced services. That said, it can be made easier with an
automation and CRM platform which allows for in-depth lead details and keeps a schedule of communication.
Email Nurturing: For companies whose free-trial numbers are a bit beyond the capability of even the largest account manager department, the best option is a complete
email-marketing strategy. Ideally
triggered by the action of your leads, your business sends emails based on your free trial lead’s interests.
For instance, let’s say your free trial lead visits one of your business’ product pages twice in two days. You might want to send them an
email asking them if they have any questions about the product or offering a platform comparison sheet focused on that specific product.
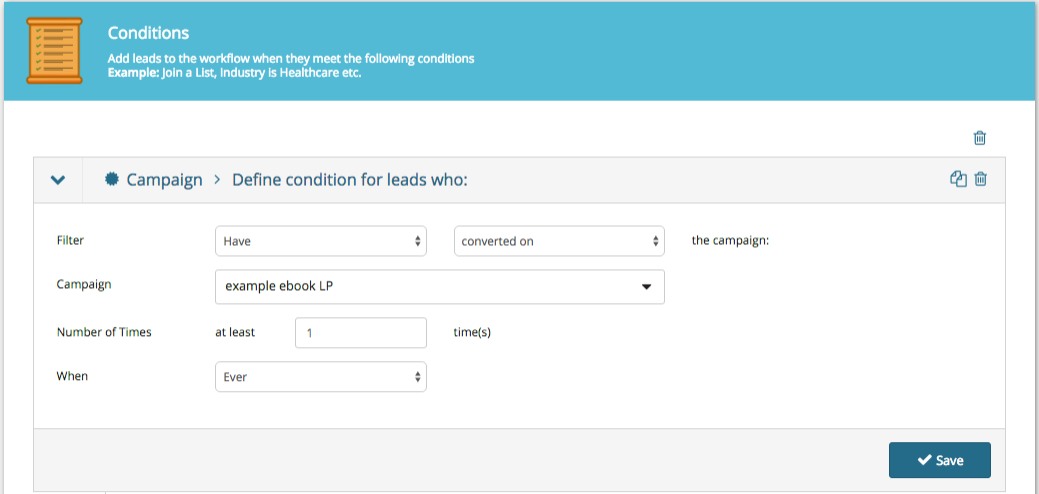
Here’s the simple set of conditions you’d set to trigger that email being sent in a
marketing automation platform:
I’ll get into the actions this might trigger below.
Important Points about Free trial Leads:
To onboard a free trial lead it’s essential you give them each and every selling-point your business offers. But it’s equally essential you do this in a less-than-salesy way. I recommend delivering buying guides, case studies, competitor comparison charts, and making your exchange as personal as possible.
For more on onboarding free trial leads, see the section on late-stage lead nurturing below.
2. Opt-in Lead Generation:
Your business can generate opt-in leads by offering valuable content to people in exchange for their email address.
Essentially, your business creates valuable, educational content interesting to your target market. Either through blog subscription (i.e. a reader of your business’ content decides they want to receive it regularly and subscribes via a form or
website popup) or email-gated content (i.e., a visitor to your site or blog is incentivized to provide their email address in return for an email-gated comprehensive resource).
Important Points about Opt-in Leads:
Opt-in leads aren’t equivalent to free-trial leads (which are already semi-nurtured) and as such they’ll need more nurturing before they become clients or customers.
Which is why we need to generate as many of them as possible, and also ensure they’re as qualified as they can be. That, of course, brings us to landing pages….
Landing pages are
how you get the opt-in of most of your leads. For the purposes of this guide, I’ll be more accurately describing squeeze pages in this section (which are simply landing pages optimized for lead generation).
For instance…

Creating a
landing page like this one places a visitor’s attention on the single conversion ask: there’s no navigation bar, no sidebar links, and the focus of the page is on the CTA button.
Software company
Axway increased their marketing ROI by 291% and saved $100,000 per year by building custom landing pages for their PPC ads. Instead of sending traffic to their homepage they built a dozen landing pages designed for conversion. It just makes sense.
Click here to check out Wishpond’s landing page platform and start building your own optimized funnel, completely free up to 200 leads.
Marketing and Sales Funnel Stage Three: Nurturing Leads
Just like there’s no point in driving traffic to your website if you’re not converting them into leads, there’s equally no point in generating leads if you’re not going to turn them into sales.
The best strategy of
email marketing is what’s called an email drip campaign, so called because of those fancy irrigation systems which slowly drip water onto a plant or seed.
Essentially, you deliver a set series of emails (6, initially) over the course of a couple weeks from the moment your lead gives you their information. These
emails are designed to inform and educate your lead, develop trust and a relationship, and ultimately encourage them to find out more about your business and eventually become a customer.
Let’s get into the specifics...
Email Drip Campaigns:
A critical component of lead generation is segmentation: you need to know what your leads are interested in so you can effectively nurture them towards a sale.
For many businesses this will be straightforward (particularly if you do one thing). For others (Wishpond for example) it’s a bit more complicated.
Businesses might have a few different selling-points. If a lead is particularly interested in one of them, selling them on another might be completely ineffective.
The best strategy for nurturing opt-in leads is to do so based on the subject they converted on initially. For instance, let’s say someone converted on an
opt-in page for an ebook on landing pages, here’s how we’d set up an email drip campaign on that subject:
Firstly, write your emails… Although you should test the frequency and content of your lead-nurturing
emails, the rule of thumb is 4:1:1: four educational, one transition email, and one sales email:
- First article: Basic - simple but highly relevant
- Second article: Transparency - builds rapport
- Third article: Resource - highly valuable for every business
- Fourth article: Personal - “Mistakes I’ve made and what I learned” with some business exposure
- FIfth article: Comprehensive - long-form, shows your business clearly
- Sales: Personalized and informal. Prompt a conversation, VIP demo, or free trial.
For a lead interested in landing pages, they might look like this:
- Email #1 Subject Line: “The next step for your landing pages”
- Email #2 Subject Line: ”We just did something with our landing page that you have to try”
- Email #3 Subject Line: ”Free image resources we've compiled since 2013”
- Email #4 Subject Line: “My most influential landing page A/B tests from 2015”
- Email #5 Subject Line: “How to set up a sales funnel with multiple landing pages (step-by-step guide)”
- Email #6 Subject Line: “Setting up a time to talk landing pages”
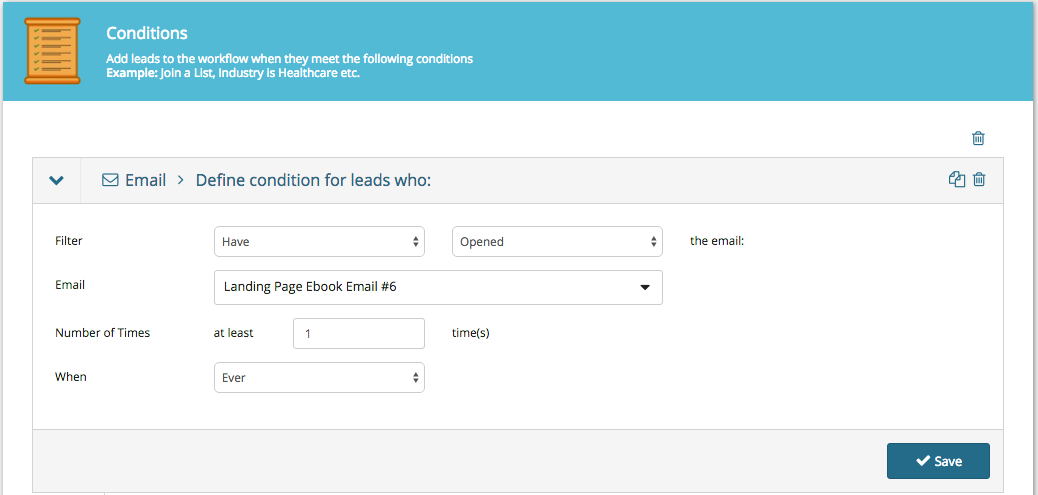
Secondly, set the conditions of your email drip campaign.
This basically just says that all leads who have converted on an opt-in page (in this case, for a landing page ebook meet our conditions and will be sent our nurturing emails.
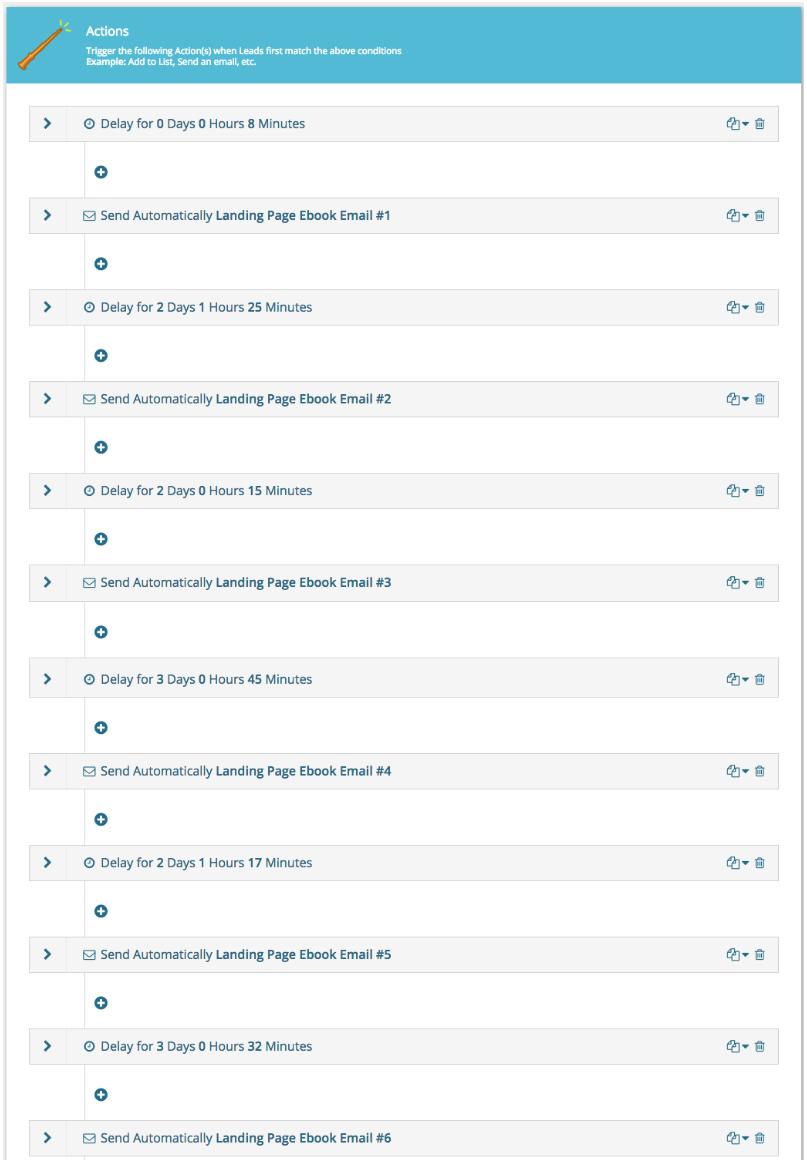
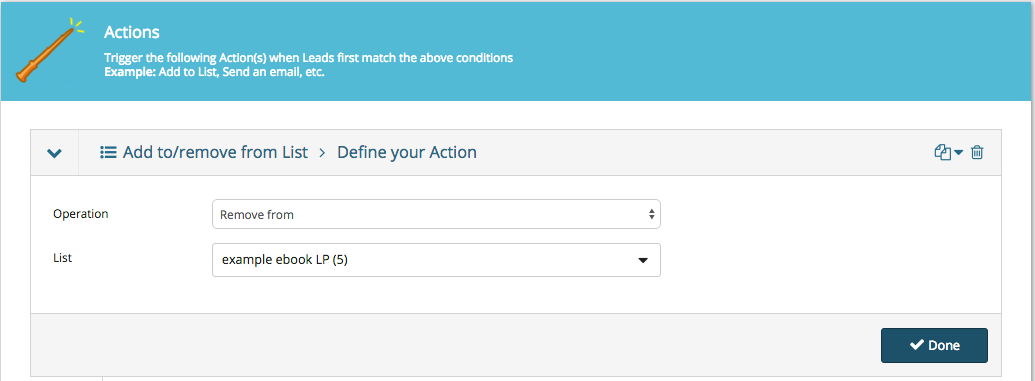
Thirdly, set the actions for this workflow. We need to determine what happens when someone meets the conditions above:
I’ve set a 7 minute delay after the initial condition is met (conversion) and then two or three days between all the subsequent drip emails being sent. I send them around the same time every day to better personalize the campaign.
Next we have to set a separate condition to stop our workflow and move our leads to the next stage of our sales funnel...
Important Points about Email Drip Campaigns:
The most crucial part of
email marketing drip campaigns is testing your content. You’d be amazed how impactful a simple subject line change can be on a campaign’s open or click-through rates.
A few lead-nurturing best-practices to keep in mind:
- Keep it personal. Use first names, casual language, and prompt a back-and-forth. It’s far harder to unsubscribe or refuse a request from someone you’ve spoken to personally or have a relationship with.
- Keep it focused on the subject they’re interested in. Segment carefully. Test the resource email I’ve recommended above.
- Keep it short and to the point. Tech and B2B leads receive dozens of emails every day (at least). Make yours easily skimmable and ensure it communicates value quickly.
- Have someone monitoring the “from” email account. If a lead being nurtured does respond don’t let that communication be lost.
Marketing and Sales Funnel Stage Four: Closing Leads
Now it’s getting exciting. We’re a simple step away from turning a hot lead into a closed lead. They just need that little nudge.
This next stage is a short and simple one, very similar to the one before...
Late-stage Lead Nurturing Campaigns:
A late-stage lead is someone who has expressed interest in your platform beyond the fact that you produce valuable content.
This is a delicate stage, as it’s essential that your business is paying attention to the actions of your leads, or you could miss the moment they’re most interested in a paid conversion.
Another term for a late-stage lead is “hot.”
Here are a few common actions of leads who might be heating up:
- They’ve visited your company’s product, pricing or plans pages. You can set this as a condition by choosing “URL + contains.”
- They’ve downloaded one of your more sales-oriented pieces of content, like a buyer’s guide or competitor comparison table.
- They’ve gone to your “About Us” page.
- They’ve attended a webinar and asked a service-focused question in the Q&A session. The webinar host can manually make note of this in their lead profile.
Similarly to the early-stage lead nurturing, late-stage is a simple email drip. This time however, the content is a bit different.
We’re trying to answer three primary lead questions with late-stage lead nurturing:
- How does your platform address my pain points?
- What do you offer that your competitors don’t?
- How does your service or platform work?
Here’s my recommendation for the five emails of a late-stage email drip campaign:
- Email #1 Subject Line: “2015 marketing automation platforms buyer’s guide”
- Email #2 Subject Line: “5 use cases to inspire”
- Email #3 Subject Line: ”Some kickass case studies from the past few months”
- Email #4 Subject Line: “A video breakdown of the Wishpond platform from top to bottom”
- Email #5 Subject Line: “Re: January discount for people we like”
Remember, all of these emails need to be tested. The recommendations I have above (for buyer’s guides, use cases, case studies, platform breakdowns and a promotion) are simply that, recommendations.
Once this campaign is finished, your lead will have either converted to a paid plan or not. Simple.
If they don’t, your funnel can’t simply forget about them.
A lead who doesn’t convert when you want them to isn’t a lost lead, but simply a lead working to their own schedule.
As a result, you need to move them (rather than drop them)...
This keeps your leads within your brand’s communication strategy and keeps you top of mind.
Important Points about Late-Stage Lead Nurturing:
Often by the time your lead becomes “late-stage” they will already be exploring your business as possibly addressing their pain-points. As such, you don’t want to keep nurturing them if they’re already ready to convert.
The simplest way to ensure your business reacts at the right time (and doesn’t under or over-shoot) is to set up something called lead scoring.
Lead scoring is a feature of
marketing automation which assigns values to the actions of your leads.
If a lead goes to your pricing page a couple times in one day you know they’re thinking about a paid conversion. You don’t want to keep communicating with them like they’re a new blog subscriber, but rather push them to act now (perhaps through an exclusive, time-constricted discount or something).
Lead scoring allows you to do that. Two visits to a pricing page might be the conditions for a lead-score setting of 10, which triggers a late-stage email series or even a sales call.
Marketing and Sales Funnel Stage Five: Retaining Customers
That’s where most sales funnel articles would stop. We’ve generated our lead and nurtured them to a sale.
But this ain’t no ordinary article.
Let’s take it a bit further, because it’s really not too much work to optimize your retention strategy with
marketing automation...
Top-of-Mind Campaigns:
It’s substantially cheaper to re-sell to previous customers than to generate new ones (
five to ten times cheaper) and they spend around 60% more on average.
So investing in retention is a good policy, particularly because it’s so incredibly easy to set up...
For B2B companies, every time your salespeople or drip campaigns secure a lead’s patronage, their contact details should be added to a “Customers” list (either automatically with a simple workflow, or manually by a sales associate/account manager).
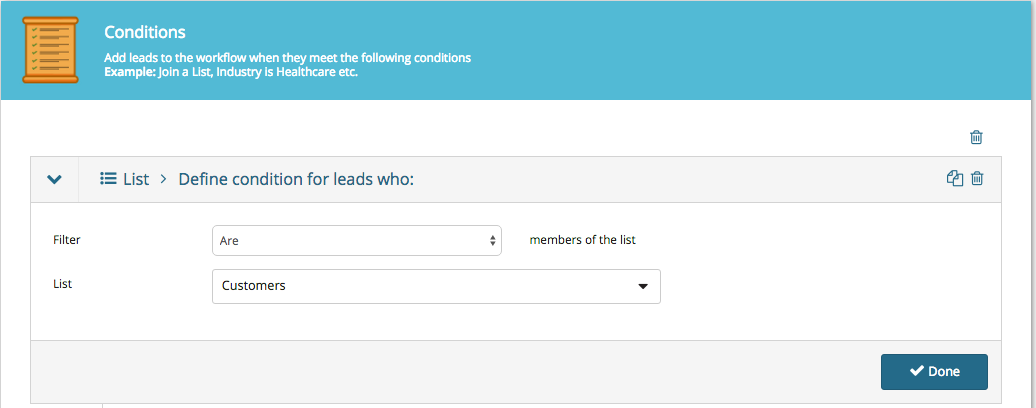
Create a workflow for all people who are added to your “Customers” list:
Every time you add someone to your “Customers” list they’ll meet the workflow’s conditions and the actions below will be started:
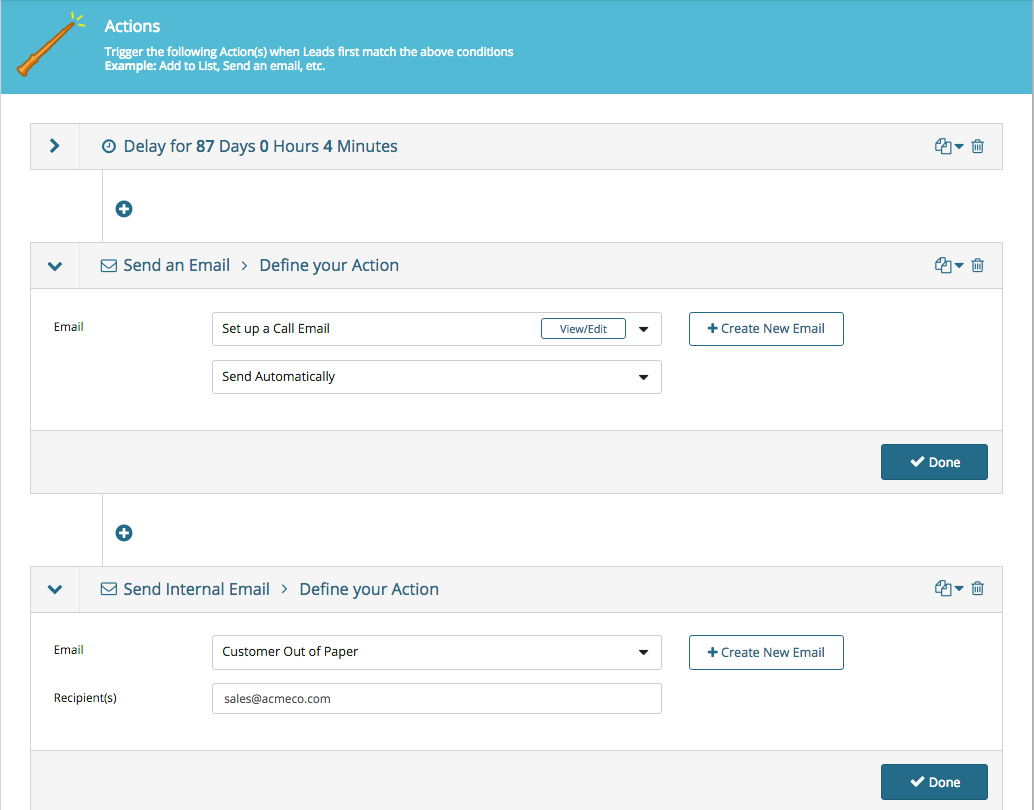
The image above is more an example for B2B companies with three-month sales cycle (for instance, you market a company which sells stationery or paper which runs out roughly every 3 months). We set an
automatic “are you ready to buy more paper?” email with an 87-day delay.
You’ll also see that we’ve added the action of sending an internal
email to the sales team notifying them that one of their accounts needs to be called.
For SaaS or B2C customers, it’s more likely that we’d simply send a
marketing newsletter when a sale or platform update is coming up.
Important Points about Top-of-Mind Campaigns:
Marketing automation should make your life easier. It allows you to schedule and optimize communication without thinking about it.
That said, it shouldn’t pinhole you into one single strategy which can’t be changed.
Your
marketing automation platform should be flexible and easily-altered. Have a new email or subject-line which has better open or click-through rates? You should be able to plug it in. Have a new lead-generating campaign or ad campaign? You should be able to easily add those new leads to an existing workflow, List, or drip campaign.
Yes, if you spent six months (and had a developer) you could create something which did what you wanted it to, but changing it seemed to break the whole process, like a popsicle stick castle - sure it looked pretty, but try to add a new campaign to the bottom and the whole thing topples to the ground.
Conclusion
Hopefully this comprehensive guide has given you a better idea of how a marketing and sales funnel works, as well as how your business might implement one.
If you have any questions about any stage don't hesitate to reach out in the comment section below.